Friday, September 8, 2023

German Chocolate Ice Cream Recipe


Baskin Robbins used to have a German Chocolate Cake ice cream flavor that I loved! Milky chocolate ice cream with coconut, caramel swirls, pecans, and chunks of chocolate cake. This recipe is my attempt to capture the flavors of that ice cream. (The main difference is that I don't add the cake pieces.) It turns out smooth and creamy and delicious!

INGREDIENTS:

1 1/2 cup heavy whipping cream (divided)
1 tablespoon cocoa powder (I use Trader Joes)
1/2 cup milk chocolate chips
1 can coconut milk (use full fat for richer ice cream)

1/3 cup sugar
Pinch of salt
3 egg yolks

1/4 teaspoon vanilla
1/2 cup shredded coconut
1/2 cup chopped pecans

1/2 cup jarred caramel sauce (I use the salted caramel sauce from Trader Joes)

DIRECTIONS:


1. In a medium saucepan over medium heat, bring 1/2 cup cream and 1 teaspoon cocoa powder to a boil, whisking to blend the cocoa. Reduce the heat and stir in chocolate pieces until melted.
2. Remove from the heat and pour into a large bowl. Stir in the can of coconut milk.
3. In the same saucepan over medium heat (no need to clean it), warm the remaining 1 cup of cream, sugar, and salt.
4. In a separate small bowl, beat the egg three yolks. Temper the eggs by slowly pouring some of the warmed milk into the yolk, whisking constantly, then pour it slowly back into the saucepan.
5. Continue cooking the cream mixture over medium heat, stirring often, until the mixture thickens and coats the back of a spatula or spoon (170F on a thermometer).
6. Remove from the heat and pour the thickened mixture through a mesh strainer into the chocolate mixture. Stir in the vanilla, coconut, and pecans. Place the bowl in the refrigerator to cool.
7. Once the ice cream mixture is cold, freeze it in your ice cream maker according to the manufacturer's instructions. Once it's churned, fold in spoonfuls of the caramel. (Note: I use a Cuissenart with a container that you must freeze in advance.)
8. Freeze in an airtight container until firm, roughly 4 hours or overnight.


Monday, December 19, 2022

Bread Machine Sandwich Rolls


Have you ever wanted to make your own sandwich rolls at home, but thought it would be too time-consuming or difficult? Well, I have a recipe that will change your mind! These bread machine sandwich rolls are easy to make and taste so much better than store-bought ones. They are perfect for sandwiches at lunch or a burger at dinner.

I never use my bread machine to actually bake bread, but I love using it to mix the dough for these rolls. All you have to do is add the ingredients to the bread machine, turn it on, and let it knead the dough for you. Leave the dough in the warm machine to rise until doubled. Then divide it into individual rolls and shape them into the desired size and shape. 

Once the rolls have doubled in size, they are ready to be baked. Sometimes, I brush them with a little bit of melted butter before baking to give them a nice, soft crust. And that's it! In just a few easy steps, you'll have homemade sandwich rolls that are perfect for any occasion.

Once you try making your own bread machine sandwich rolls, you'll never want to go back to store-bought ones again. They are so easy to make and taste so much better, it's worth the extra effort. Plus, there's nothing quite like the smell of freshly baked bread filling your kitchen! Give this recipe a try and see for yourself just how delicious homemade rolls can be. Trust me, you'll never want to go back to store-bought ones again!

Ingredients:

  • 3 1/2 cups bread flour
  • 1/3 cup sugar (can reduce, if desired)
  • 1 1/2 teaspoon salt
  • 3 tablespoons dried milk
  • 1 package dried yeast
  • 4 tablespoons butter, cut into small cubes
  • 1 cup very warm water (add more if needed)
  • Sesame seeds (optional)
Directions:

1. Place the bread flour, sugar, salt, dried milk, and yeast in the bread machine and start the machine on the "Dough" cycle. Let the dry ingredients combine for a minute or two.

2. Add the cubes of butter and the cup of very warm water. Let the machine do the work of mixing and kneading the dough for you. If the dough seems too dry, add additional warm water one tablespoon at a time. Once the dough is mixed, let it stay in the warm bread machine cycle for about an hour or more,  until the dough has doubled in size.

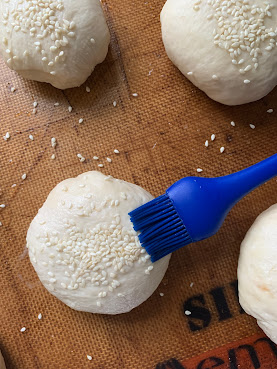
3. Turn the dough out onto a lightly floured surface and divide it into 8 equal pieces. Form each piece into a roll shape and place them on a baking sheet lined with parchment paper. If you wish, brush the rolls with water and sprinkle with sesame seeds. Cover the rolls with a towel and let them rise in a warm place until doubled in size, about one hour.

4. Preheat your oven to 350°F. Once the rolls have risen, bake them for 10 - 15 minutes or until they are lightly brown on the outside. Remove them from the oven and let them cool for a few minutes before serving.

Enjoy your homemade sandwich rolls with your favorite sandwich fillings or as a bun for burgers. 

Monday, December 12, 2022

Spumoni Chocolate Chunk Cookies


Are you looking for a unique and delicious cookie recipe to add to your holiday baking lineup? This week I was inspired by this recipe for Spumoni Cookies by Lani Bakes!

https://lanibakes.co/2022/12/07/spumoni-cookies/

I came across this recipe on Instagram and was immediately drawn to the combination of ground pistachios with both regular and bread flour in the dough. The addition of cherries and chocolate chunks sounded delicious, so I decided to give the recipe a try.

The recipe listed its ingredients in grams, but I converted them to approximate standard US measurements for those who don't have a food scale. The amounts of the add-ins and toppings do not need to be exact, so feel free to adjust to your preference.

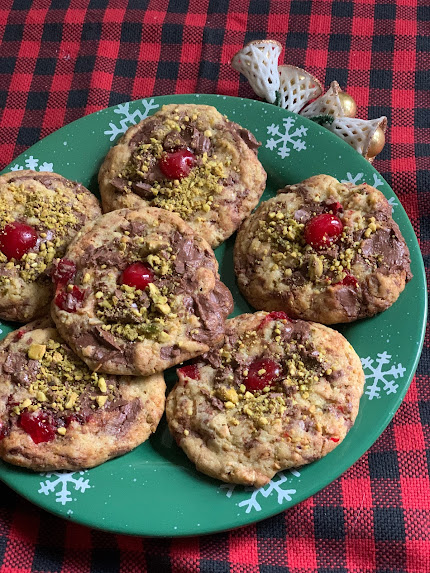
These cookies are soft, chewy, and dense with chocolate. They are a perfect addition to any holiday cookie platter and are sure to be a hit with friends and family. If cherries aren't your thing, dried cranberries would also work well in this recipe. Give these Spumoni Cookies a try and let me know what you think!


Ingredients

5/8 cup raw pistachios (90 grams), divided, saving about 1/8 cup for topping

1 stick (110 grams) unsalted butter, melted

3/4 cup (150 grams) sugar

1 egg

1/2 teaspoon fine salt

3/4 cup (100 grams) all purpose flour

1/2 cup (70 grams) bread flour

1 teaspoon baking soda

1 1/2 cup chocolate (milk, dark, or a combination), chopped into chunks, reserving about a 1/4 cup large chunks for topping (I used the large milk chocolate bar from Trader Joes).

8 ounce jar (90 grams) maraschino cherries, drained and chopped

12 whole maraschino cherries, with or without stems

Directions:

1. Preheat your oven to 350F.

2. Use a small food processor to grind 1/2 cup of pistachios into a fine meal. (It's ok if there are a few small pieces). Take the remaining 1/8 cup and roughly chop with a knife and set aside to garnish the top of the cookies after they bake.

3) Melt 1 stick of butter. (I used a medium sized glass bowl in the microwave.) Add 3/4 cup sugar and combine with butter. Add one egg and 1/2 teaspoon salt and stir together.

4) Add 3/4 cup all purpose floor, 1/2 cup bread flour, and the half cup ground pistachios. Stir gently until partly combined. Some dry ingredients should remain unblended.

5) Add the chopped maraschino cherries and about 1 1/2 cups of chopped chocolate. (The additional chocolate will be used to top the cookies before you bake them.) Fold them into the dough and combine until all the ingredients are combined together.

6) Use a scoop or a spoon to make balls out of the dough ( about 1/3 cup per cookie). Place on 2 cookie sheets lined with a silicone liner or parchment paper, leaving ample space between cookies. Top cookies with the reserved large chocolate chunks.

7) Bake the cookies for about 12-15 minutes, rotating the baking sheets halfway through the bake to ensure they cook evenly. The cookies should be golden at the edges and still soft in the center when they are finished baking.

8) Press a maraschino cherry into the cookie while it is warm and add the remaining pistachio chunks into the melted chocolate on top.

9) Let the cookies cool for a few minutes, then transfer them to a baking rack to cool.

10) The cookies can be stored at room temperature for a week. If you want a bit of "bite" to the chocolate chunks, refrigerate to harden the chocolate a bit.

Makes about 16 cookies, depending on size.


Friday, August 2, 2019

Iceland Day 11 - Blue Lagoon

It was time to head home. After another good breakfast at Hotel Fron, we packed up and headed towards the airport. We had reservations at the Blue Lagoon (which is located on the road to the airport) at 10 AM.


We arrived early, but we could not enter until 9:45. Our "Comfort Package" included a towel, a silica mask, and one drink of your choice. They give you a fancy electronic wristband which locks and opens your locker (confusing, but they have people that help you figure it out) and tracks any purchases you make. The locker area was much cleaner and nicer than the Nature Baths at Myvatn. They have private shower areas (you are expected to totally shower without a swimsuit before entering). They also have an inside ramp that goes into the pool, so you don't have to run outside in the cold!


The pool was built with black volcanic rocks and is quite large with a lot of alcoves to wander and relax. Although there were lots of people in the pool, it never felt overly crowded. The geothermal water really is blue, warm, and steamy. The water is silica-rich and feels very relaxing. 


We tried out the silica masks - the look is a bit scary!

By the way, I used this waterproof case for my phone. It worked fine, although some pictures got a bit blurry when shot through the plastic.


We stayed in the water for a couple of hours, then headed back to the locker room. The locker room has Blue Lagoon special shampoo, conditioner, and lotion - use it, because it is really expensive if you want to buy it in their store. They also have hair driers and bags for your wet swimsuit.

We headed for the airport, returned our rental car, and then got checked in for our flight. We had a two-hour flight delay, so we ate some lunch and then just hung out in the airport. Our flight departure actually was on a lower level where there wasn't much seating. People got into a long line before the flight is ready to board. Our IcelandAir flight unexpectedly had chartered an airplane from another airline - we ended up in different seats than we had booked. It was pretty old - my tray table was wonky and the entertainment system didn't work. But it got us home safely. We spent the night in Toronto at the Delta Marriott Hotel near the airport, taking advantage of their park, stay, and fly service. The next day we drove back home

Iceland was amazing! If you ever have the chance to visit, GO!


Thursday, August 1, 2019

Iceland Day 10 - Snæfellsnes Peninsula

For our last full day in Iceland, we toured around the Snæfellsnes Peninsula before returning to Reykjavik. The day was pretty gray but the rain held off until we were done touring. We made a stop at a bakery to pick up something to eat for lunch, then started driving around the peninsula.


Our first stop was Kirkjufell (Church Mountain), which is famous for its iconic view of both the mountain and waterfall. I loved this location! We walked around the falls to see the views from all the angles.


That's me at the top of the bridge!


We continued through Snæfellsjökull National Park. The center of the park is the glacier topped volcano called Snaefellsjokull. 


The road goes along the coast past more waterfalls and lava fields. We stopped at the black sand Djúpalónssandur Beach. A short hike takes you through some massive lava formations down to the beach.


The beach is still littered with the rusty remains of a ship wreck that happened in 1948.


The rock formations along the beach were beautiful. (A moody edit for a cloudy day using the Snapseed app.)


Our next stop was for a short hike out to the lighthouse which is located near the Lóndrangar Basalt Cliffs. 


Another brief stop was at the fishing village of Arnarstapi.


A beautiful view looking out at the mountains and coastline.


A final stop was at the Black Church at Búðir. We managed about 5 minutes at this spot before a big bus of tourists unloaded. I think I got pictures of the church from every angle. Here are a few of my favorites.


There were a lot of other places we could have stopped and hiked on the Snæfellsnes Peninsula, but we had a drive of several hours back to Reykjavik for our last night's stay. We were lucky that the rain held out until we started heading back. 

We spent our last night at the Hótel Frón which is where we stayed the first night. This time we stayed in the front part of the hotel in rooms that seemed a bit newer. 


We ate at Reykjavik Fish Restaurant which was just down the road from our hotel. My friends had the fish and chips (again) but I tried the fish on a stick which was a combo of two kinds of fish on, what else, a stick! It was ok, but I thought it needed a bit more seasoning. We finished off with ice cream at the nearby Valdis Ice Cream. We then hurried back to our hotel to repack for our trip home.

Wednesday, July 31, 2019

Iceland Day 9 - On the Road Again


Before leaving Hofsstaðir Guesthouse, we went across the road to get a closer look at this small pretty church.  


There were some Icelandic horses in the nearby fields.


Once we took off, one of the first tasks of the day was to find some gas. After driving for a bit we reached a teeny town with one unmanned gas pump. 


Today was a long driving day with no specific stops to break the drive up. It was gray and misty. More rolling hills, mountains, coastline. A large portion of this drive was on gravel and the weather was rainy. (We were fortunate that the two times that we had extended rain were when we had a long drive.)  


More Icelandic horses along the way, including some babies!


Midafternoon, we reached the coastline town of Stykkisholmur on the Snæfellsnes Peninsula. We stayed at the Fransiskus Hótel, which shares a building with a convent and a hospital. It was another hotel with modern comfortable rooms that had views of the ocean, harbor, and lighthouse.


After a bit of a rest, we went to explore the town. We climbed up the hill that was right across from our hotel to the small lighthouse. There were lots of wildflowers in the rocky cliffs.


The sun eventually came out. We walked through the town, checked out a shop and the grocery store, and walked to this church (which once again had such unique architecture). There were only a few restaurants in town and we struggled to kill time until the one we wanted to eat at for dinner was opened up for the evening.


We dined at a small casual restaurant called Skúrinn. We had burgers and fusion fries (a combo of regular and sweet potato). Nothing unique, just your basic burger at Icelandic prices.


I woke about midnight and found this wonderful view of the midnight sun over the lighthouse out my window.

And I was very amused to see the weather report showed partly sunny at 3 am! 
It never got dark during our trip. Between 12 and 2 AM it only got a bit gray and dusky.

Tuesday, July 30, 2019

Iceland Day 8 - Hofsstaðir Guesthouse


Our hotel for the evening was lovely Hofsstaðir Guesthouse. This spot truly is in the middle of nowhere. It lies in a lush green river valley with mountains and the ocean in the distance.


Our rooms once again were modern and had a little porch area where we could enjoy the gorgeous view. A bit of construction going on at this location, too.


We knew that there was nothing for miles, so we made reservations to eat at the restaurant located at the guesthouse. The menu is above.


We were amused by their "mineral water" which had pretty rocks at the bottom of the jar!


I had the arctic char which was delicious. It tasted similar to salmon but with a less fishy taste. The vinegarette on the salad was wonderful, too! We shared a dessert of the Country Cake.


Here is the view out the restaurant window. Loved the display of rocks along the window sill.


A traditional turf house was located right in front of the guesthouse.


Although it was cloudy and a bit misty while we were here, we did awake to a slight burst of sunshine in the morning and a faint rainbow.


The delicious breakfast included warm bread and some of their homemade jams. They also had leftovers of the char, lamb, and horse steak from dinner last night, so you were able to sample anything you missed.

This was another amazing hotel booked for us by Nordic Advisor! (Note: a lot of these hotels appear to have partnerships with tour companies, so it seems to be difficult to book them directly.)

LinkWithin

Blog Widget by LinkWithin