Showing posts with label Crafts. Show all posts

Friday, February 8, 2013

Recycled Computer Key Magnets

A few days ago, I shared the retirement card I made for my friend using old recycled keys.  Changing computer keys into magnets is super simple and fun craft to make.


You will need old computer keys (just use a screwdriver to pop them off the keyboard, a needle nose pliers, small magnets (I got mine at Michaels - use those coupons to get 40% off!) and hot glue.


The keys will have a "peg" sticking up from the inside.  Take a needle nosed pliers and you can just twist of off - it will break without much effort.


Take your hot glue gun and "flood" the inside about half full with hot glue.  Then "float" the the magnet on top.  Push it down with the pliers so it is level with the edge of the key.


I made a bunch of these and have them on my file cabinet in my computer lab.  The kids (and me) have a lot of fun spelling words out using the keys!


Such a fun craft to make as a gift - spell out a name or appropriate phrase!

Saturday, January 26, 2013

Recycled Computer Keys - Retirement Card


A few months ago, a good friend of mine retired from her job as a computer programer.  I had to come up with something clever and appropriate as a retirement card for her!  I recycled some computer keys from some old keyboards at school to make this "card" for her.


The top picture is a bit blurry, so above are a few closeups.   Here is the text:

It's a beginning, not the END
DELETE At&t and never RETURN
ESC your old job
Take CONTROL
SHIFT your way of thinking
Explore each new OPTION
Relax at HOME

I thought I came up with some pretty clever and appropriate ways to use the special keys!


 I made the background using PrintShop software and printed it on glossy computer paper.  I taped the keys onto the paper.   I used tape rather than glue because...


...if you turn the keys over, they are MAGNETS!

I know the IT guy at work thought I was crazy when I asked him to save the old keyboards!
I'll post in a few days how to make this fun little magnets - so easy!

Tuesday, December 20, 2011

Silver Glitter Snowflakes


Last year I had a lot of fun making these white snowflakes with vintage earrings. This year I took some of the same plastic snowflakes from Michaels and sprayed them silver. While still wet, I sprinkled them with a bit of Martha Stewart antique silver glitter.

I used various punches to cut shapes out of vintage dictionary paper. I stained the edges with a brown stamp and added a bit more brown color to the edges to age the paper. Then I dug into my stash to find some interesting things to decorate the centers.

Plastic swan with a button. I think I got this swan in a package from a family that I stayed with in Russia on a church choir tour. It had a vintage look, even though it was plastic, so I have kept it in my stash. I think it works perfect on this ornament!

Silver button on top of a mother of pearl button.

Giant pearly clip on earring on top of silver jewelry filigree.

Small silver key with button on top. (Bland key and plastic button, but looks cute combined together!)

Plastic crown - I think this came in a bag of junk jewelry!

All of these are now on my Christmas tree, but I think they would make great decorations for packages, too!

Wednesday, December 14, 2011

Felted Wool Flower Tutorial 2


I have been a little obsessed with making these felted wool flower pins! It is such an easy way to take an ordinary cheap sweater and make it look spiffy and pricey! Here is another slightly different way to make the flower - totally easy! (Here is a link to the first tutorial).

First, you need to purchase 100% wool sweaters from a resale store. Wash them on the gentle setting in hot water and then dry them in the dryer. Only dry them for short time - sometimes the wool breaks and you will get holes (which you can cut around). Wool should shrink up and tighten into a teeny tiny sweater!


Cut a flower and a smaller circle pattern out of newspaper. (I cut a circle out of paper, folded it in thirds, cut the petals, then unfolded.) Cut the pieces out of the wool. Since the wool is felted, it shouldn't fray.


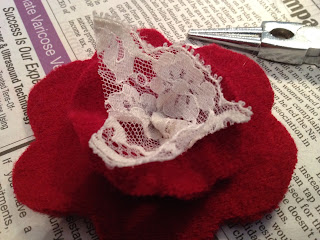
Use hot glue to glue them together. Then glue a bit of scrunched-up lace and top it with an awesome vintage earring.


Hot glue a pin backing toward the top of the pin. (If you put it in the center, the pin will sag - I know this from experience.)


The red pin looks pretty cute on this cheap red sweater from Target.


The color really pops on the same style sweater in ivory.


And for the holidays, I've been wearing it on this heather green v-neck along with an off white scarf. Spiffy, I think!

In my next post, I show a few more pins I've put together!

Saturday, December 10, 2011

Felted Wool Sweater Flower Tutorial


Step 1: Purchase men's 100% wool pants from resale shop for $1. Wash in hot water and dry in high heat dryer to shrink the fabric.

Step 2 - Cut circle pattern from newspaper or cardstock. Fold into sixths. Cut curved edges to make flower pattern (doesn't need to be perfect).


Step 3 - Cut 5 flowers from wool pants.


Step 4 - Lay one flower down as base for flower. Fold another flower in half (doesn't need to be precise) and lay down on base.


Step 5 - Fold another flower in half. Rotate by one quarter and layer on top.


Step 6 - Turn another quarter and layer the third folded flower on top.


Step 7 - Another quarter turn. Add last folded flower. Tuck the end of this flower under the first folded flower.

Step 8 - Put a large dab of glue in the center where the flowers meet. Also a few more dabs of glue underneath the folded flowers to attach them securely to the base.


Step 9 - Glue on a crocheted flower or other piece of lace on top of the flowers. (I purchased these off white crocheted flowers eons ago at the craft store. Omit this step if you wish!)


Step 10 - Hot glue a vintage pin, button, or earring to the center. Best if it has a bit of sparkle or bling!


Step 11 - Hot glue a pin backing to the back of the base. Works better if you put it towards the top rather than in the middle of the flower to avoid having the flower sag when you pin it! (Yes this picture is upside down - I rotated it, but Blogger isn't acting nice today!)


Step 12 - Attach pin to bland Kohls cardigan sweater. Cute factor improved 200 %!!!


Tuesday, January 4, 2011

Magic Crayons

I've been collecting bits of crayons from my art room in an old muffin tin.

DSC_0358

Finally had time to work a little magic. About 7 minutes in a warm oven melts them. (Watch them carefully, the aroma of melted crayons in your kitchen will not put you in a holiday mood!) Let them harden slightly, then stick them in the frig for about a half hour. Then tip the tin over, give it a firm tap, and the crayons will easily flip out.

DSC_0378

I plan to use these for some fun crayon rubbing projects.

Friday, February 19, 2010

Stamped Swirl Scarf


In December, I saw a posting by One Lucky Day where she was stamping the cutest Christmas bags. Which got me thinking about a very boring scarf that I had picked up at Walmart for $5 and wondering if I could jazz it up with a little bit of stamping. Paula was kind enough to follow up to my question with some helpful information about permanent waterproof ink. A recent snow day gave me a chance to test out my idea.

My first step was to test out some ink. Paula suggested the Archival Ink by Ranger, but I couldn't find that at the store. I found this ink by Ancient Page worked well. (Clearsnap Ancient Page Ink Pad Full Size Chocolate)


The stamps were sticky stamps that you put on a clear block. I printed random swirls from this Monarch stamp set. I made three rows of 3 different swirls. I'm not the best stamper (a few fuzzy prints, but I was going for a grungy look, haha) but it was fairly easy and took under an hour to print.

A quick ironing to set the stamping was the final step.


And tada - the final product hanging around my neck! I think another trip to Walmart to see if they have any of those more of those scarfs left is in order!

NOTE: I just checked and they still are in stock in a variety of colors. I picked up one in cream and one in black!

Thursday, December 31, 2009

Matchbox Tags


I took a lot of shortcuts this year for Christmas. Can you say "giftbags?" Yes, I recycled all the bags I had received over the past few years and just plopped my presents inside. It was pitiful. I just didn't have time to make gift bags and tags and make pretty wrappings like I had done in the past.


But then I discovered One Lucky Day - a gorgeous blog with all these wonderful tutorials showing how to make lovely tags! Oh my! I just had to go out and buy a snowflake stamp and play arround. I also had bought some matchboxes a while back, so I ended up combining a mathbox with a tag. A bit of stamping on the tag, covered the matchbox with some scrapbook paper, added a vintage picture and sticker, and attached a bit of ribbon and a jingle bell. I stuck a quarter and a perfume sample inside the matchbox as a little surprise for two little girls!

In case you are looking for further inspiration - Tags Reinvented is one of my favorite books!

LinkWithin

Blog Widget by LinkWithin