Monday, January 28, 2013

Stacking Bracelets in Turquoise and Aqua


I've had fun the past few days making several stretchy bracelets using odds and ends of turquoise beads in my stash.  I mixed in some charms, some Chinese crystals, a large fluorite bead, a quartz bead, and other bits.


I started with these two together.


A third bracelet with some soft aqua stone beads mixed with a bit of turquoise.


I especially love this one with the large fluorite stone bead - you can see a bit of purple mixed in the stone.


Sometimes the knots come loose when you use the stretchy plastic cord.  I always do a tight triple knot and then add a dot of super or Gorilla Glue on the knot.  I've had pretty good luck using this trick to keep the bracelets from falling apart. 


Saturday, January 26, 2013

Recycled Computer Keys - Retirement Card


A few months ago, a good friend of mine retired from her job as a computer programer.  I had to come up with something clever and appropriate as a retirement card for her!  I recycled some computer keys from some old keyboards at school to make this "card" for her.


The top picture is a bit blurry, so above are a few closeups.   Here is the text:

It's a beginning, not the END
DELETE At&t and never RETURN
ESC your old job
Take CONTROL
SHIFT your way of thinking
Explore each new OPTION
Relax at HOME

I thought I came up with some pretty clever and appropriate ways to use the special keys!


 I made the background using PrintShop software and printed it on glossy computer paper.  I taped the keys onto the paper.   I used tape rather than glue because...


...if you turn the keys over, they are MAGNETS!

I know the IT guy at work thought I was crazy when I asked him to save the old keyboards!
I'll post in a few days how to make this fun little magnets - so easy!

Tuesday, January 22, 2013

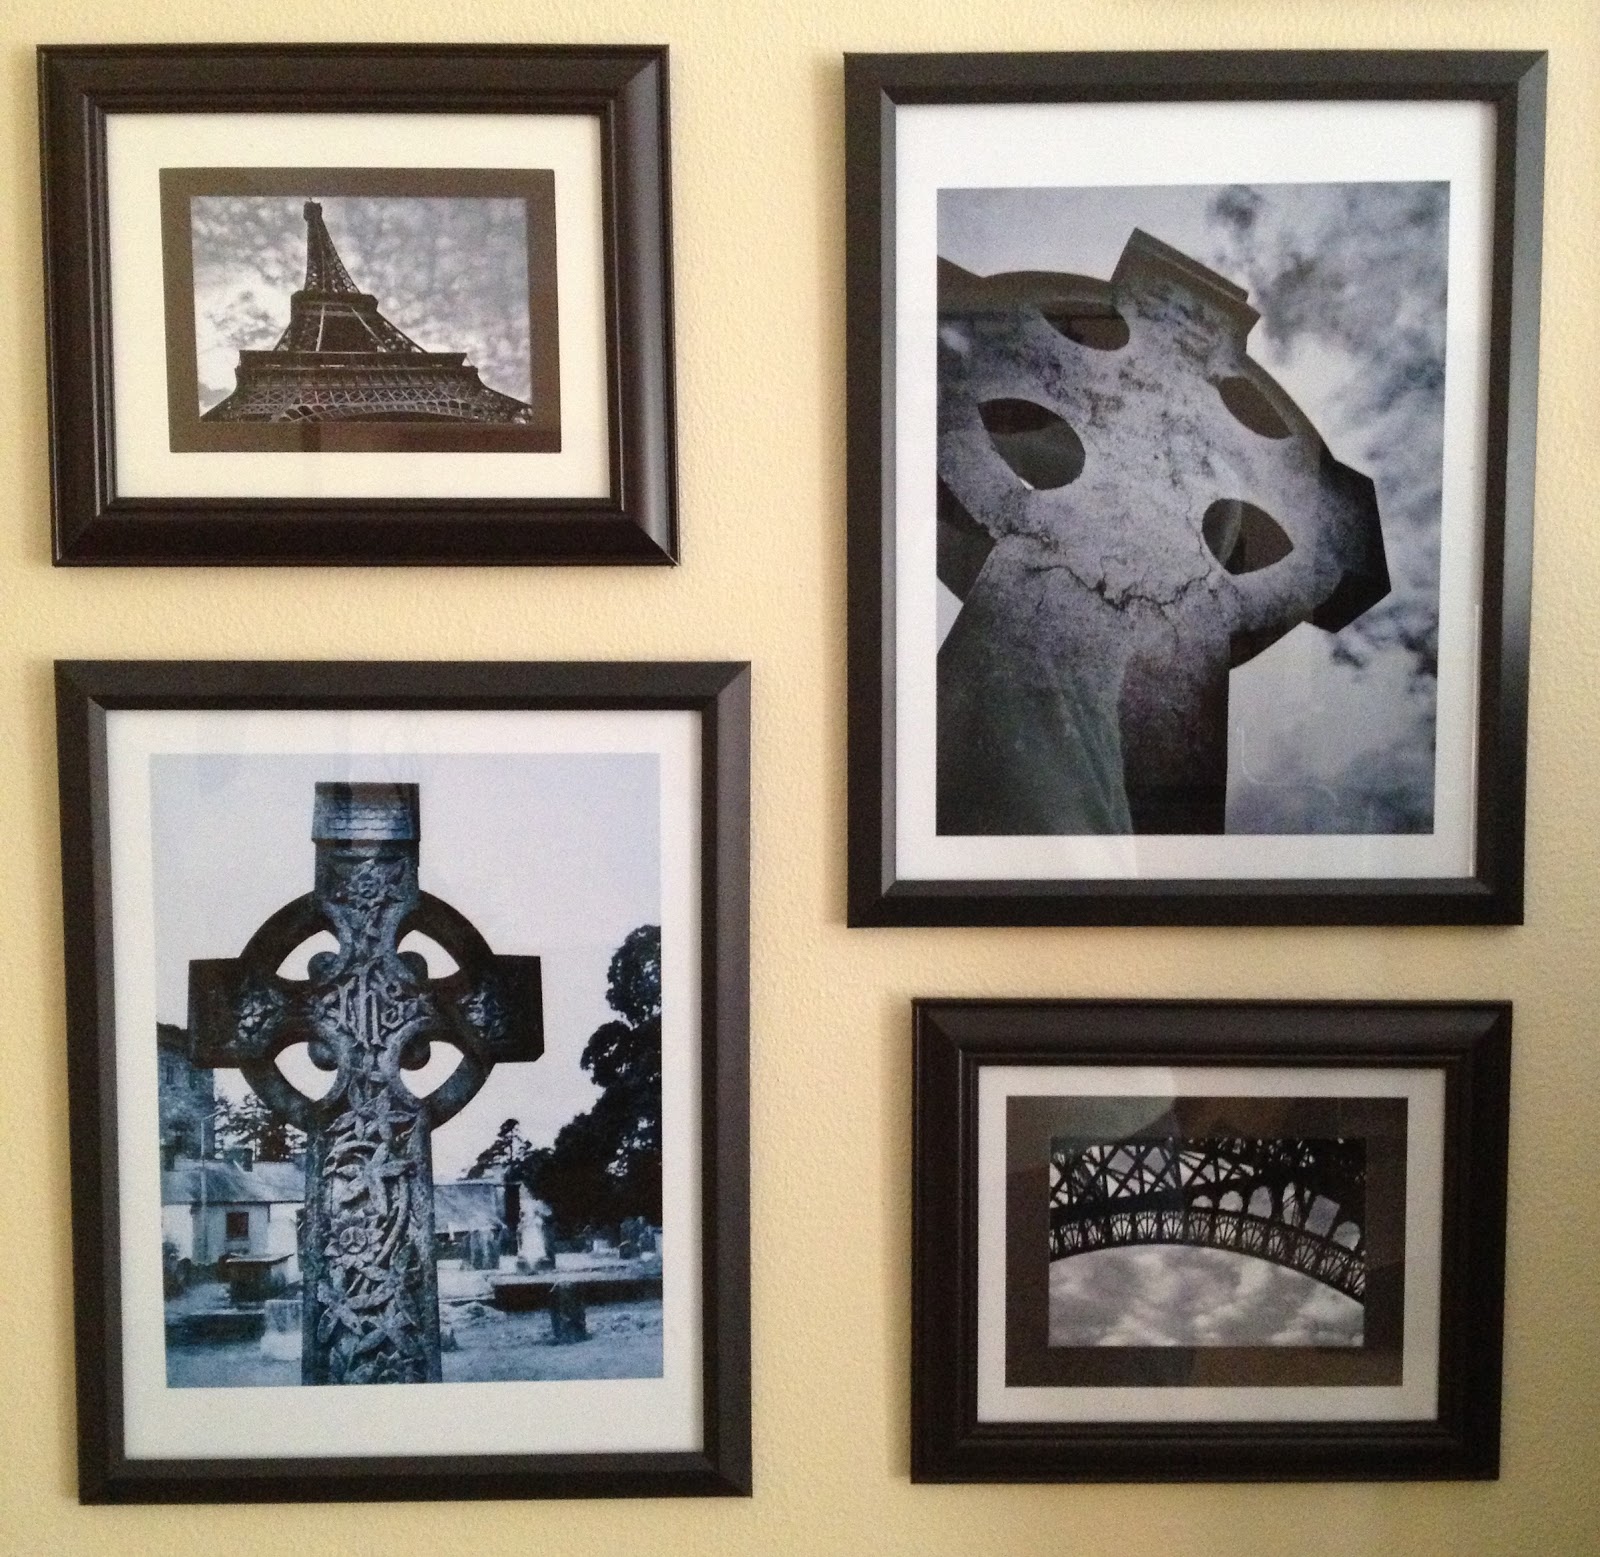
Black and White Photo Gallery


My new photo gallery in my living room using photos from my summer travels printed in black and white.


I used a combination of cheap frames from Target and the dollar store.
The larger photos are Celtic crosses taken in Ireland.
The smaller are shots of the Eiffel Tower.  (Lots of editing done using the Snapseed app to add drama!)


This was one of my favorite photos from Ireland.  I love this cross, the angle, and the dramatic sky!


The small photos are statue close ups, mostly from the Vatican Museum printed in a slightly grungy sepia.  There's a larger silhouette of a tower and gargoyles of Notre Dame in Paris against puffy clouds.


This photo of me taking a photo was taken by my good ADE friend, Jim, and is my favorite! (Thanks, Jim, for catching this moment!)
I think it is brilliant - the light outlines my body with a warm glow.
My arm echoes the point of the Gothic arch.
It reflects my passion for my Christian faith, my love of being creative, and how my heart is filled by travel.  I look at it every day and it reminds me how blessed I was to have such an amazing summer!


Tuesday, January 15, 2013

Pizzaria Biga - Royal Oak


After having had really good pizza during my trip to Italy, I have been a bit spoiled. I was so glad to discover Pizzaria Biga in Royal Oak because I think their pizza captures that authentic wood oven rustic crusty flavor that I loved in Italy.


Pizzaria Biga is located on Main Street in Royal Oak,  just a bit south of the main drag of restaurants.  It sits above the Cloverleaf Wine Shop - be advised that there is a flight of stairs to climb to enter the restaurant.  The inside has lots of metal and has a very sleek urban feel.  There is a great view of the open kitchen and wood oven where they bake the pizza.  (Note that they have a second location in Southfield which I haven't visited.)


Lunch is a great time to visit - they have a deal during the week where you get a free salad or soup and a drink with purchase of a pizza or main course.  What a deal!  The salads are very fresh and have interesting combinations. Above is the Garden Salad.


During another visit,  three of us shared a large salad of butter lettuce with dried cherries, gorgonzola, walnuts, and raspberry vinaigrette which was plenty for all and very delicious!  I've also tried the chopped salad which I didn't think I'd like, but it was great!


The pizzas are sized for enough for one person with a few slices let to take home. (Or 2 people could share a small salad and a pizza).  The crust is amazing and has a unique flavor and chewy crust that comes from their special use of yeast.  This white Funghi pizza (above) with goat cheese, mushrooms, and thyme is to die for!


You'd never believe how wonderful the fingerling potato pizza is!  Very unusual, but great flavor.


The red sauce pizzas are equally good.  Above is a Margherita pizza - such wonderful fresh ingredients!


The desserts are very tempting.  I tried some coconut gelato - it was ok, it seemed a bit crusty on the edges like it had been sitting in the freezer a bit too long.  I loved the dramatic way it was served with a crispy cookie on top.


This is the dessert to get! I forgot the Italian name, but it is fried dough rolled in sugar with raspberry and chocolate dipping sauce.  Yum!  I've had this twice!

I also wanted to mention that their pizza is great for take out and the prices are even a bit cheaper! They have a great selection of fresh and house made toppings that will let you create the pizza of your dreams.  A big recommendation!

Saturday, January 12, 2013

Farro with Bacon and Apples


Any out there ever had farro? Or heard of it?  Over the past year or so I have seen several recipes for this Italian grain in Bon Appetit and other gourmet magazines.  When I looked for it at the fancy grocery stores it was VERY expensive - over 5 dollars a box - too pricey for me!  So I was excited when I found this bag in the new product section of Trader Joe's for under $2.  I discovered that it is very similar to barley and has a nice nutty texture that blends well with wintery flavors.

The package had a recipe for Farro with Sausage and Apples on the side - no sausage at home, so I decided to try something similar using some bacon pieces I had in the freezer.  Here's what I put together:


Farro with Bacon and Apples


2 cups uncooked 10 minute farro (1 package)
3 cups chicken broth
1/3 uncooked bacon pieces (Trader Joe's sells bits and pieces for cheap!)
1 small onion
1 small package of sliced mushrooms
3 small apples, peeled and sliced
1 teaspoon chopped garlic
olive oil
salt and fresh ground pepper
Fresh chopped rosemary (if you wish!)


1.  Heat the chicken broth in a medium pan until boiling.  Add the farro.  Turn down the heat and boil for about 10 minutes.  (The package directions said to drain the remaining broth when done, but I found it absorbed most of the broth.  Maybe I overcooked it?)  Let the faro rest in the pan covered for a few minutes, then fluff with a fork.

2. Meanwhile, in a large Dutch oven, cook the bacon until crispy.  Remove the bacon, but leave any drippings behind for flavor.


3.  Cook the chopped onions for about five more minutes or until golden and soft, with olive oil if needed. Add a bit more olive oil to the pan, then toss in the apples and mushrooms and cook for another five minutes until softened.  In the last minute add the chopped garlic.


4.  Finally, add the faro and toss and cook for another minute.  Add salt and pepper to taste and fresh rosemary if desired.  Can be served warm or cold.


I think farro could be very versatile - as I prepared it, it would be great as a side dish.  With more meat or vegetables, it would make a great meal.  The next day I had it cold, tossed with some chopped baby spinach and parsley, topped with a few pine nuts, grated romano cheese, and a drizzle of olive oil.  A perfect Mediterranean salad - I think this will be my lunch for the next few days!


Tuesday, January 8, 2013

Black Walnut White Fudge


When I was a kid, my mom used to make "White Fudge" every Christmas.  She often gave it as gifts and we would love to lick the bowl after she made it.  It was sugary sweet and I absolutely loved it.  I have her original recipe, but have had mixed results when making it - if you don't get it to the exact temperature it either crumbles like sugar or is hard like a brick.  I haven't made it in years.

A few months ago I found the secret ingredient in this fudge in the markdowns at Kroger - Black Walnut Extract!  I decided to try making it again, but this time using white chocolate chips to make the process easier.  (If you can't find the black walnut extract, try either vanilla or almond flavoring, but the flavor will be different.  The black walnut really adds a unique rich flavor to the fudge!)  This recipe also contains the surprising addition of sour cream (which my mom didn't use), which adds a bit a tang to the fudge and enhances the creamy texture.  The basis for this version comes from a Kraft recipe clipping that I probably cut out of a magazine about 25 years ago.  I changed several of the ingredients to make my version.


Black Walnut White Fudge


Ingredients:

2 cups sugar
3/4 cup sour cream
1/2 cup butter
12 ounce package white chocolate chips
1 7 ounce jar marshmallow creme
2 teaspoons black walnut flavoring
1 cup walnuts, coarsely chopped

Directions:

1.  Combine sugar, sour cream, and margarine in a heavy 3 quart saucepan.  Bring mixture to a full rolling boil.  Stir constantly for 7 minutes, or until temperature reaches 234 degrees. (The seven minutes was pretty accurate for the time to get to the correct temperature.)
2.  Remove from heat and immediately stir in the chocolate chips until melted.  Then add the marshmallow creme, the black walnut flavoring, and walnuts and beat with a large spoon until blended.
3.  Pour into a greased 9 inch baking pan.  Cool for about 30 minutes, then cut into squares while still slightly soft.  Finish cooling before removing from pan - put in refrigerator if too soft to remove.
4.  I keep the fudge refrigerated and let it come to room temp before serving.  It freezes nicely, so you can make it in advance!


Sunday, January 6, 2013

Granite City Food and Brewery - Troy

Granite City is a very popular restaurant in Troy these days!  I've eaten here twice and have enjoyed both meals.  The menu is very upscale bar food - a variety of tempting appetizers, pizza, sandwiches, pastas, and main entrees.


The first time I ate there was on a Friday night.  Good thing we had called ahead for seating, because the wait at 6 pm was well over an hour.  We ended up at a high table in the bar.  It was VERY noisy and crowded, so this is not the best place to go for conversation.


The second time I came for lunch and we sat in the front room.  As you can see, it wasn't as busy and it was much easier to talk and enjoy the meal.  (The room is a bit drafty on a cold winter day.)


Be sure to request the bread!  It is crusty and served warm from the oven!


The pastas here are wonderful and come in large servings, so you are certain to have some to take home.  Above is chicken with sun dried tomatoes, asparagus, and pine nuts.


I had the Adult Mac and Cheese on my first visit and it was amazing!  Three cheeses, chicken, bacon, and crunchy bread crumb crust!


On my second visit, I had this special of barramundi with rice and grilled asparagus.   Much healthy, but not quite as yummy as the Mac and Cheese!


You must save room for dessert!  This large toffee cookie is served warm in a skillet with ice cream and caramel sauce on top.  Very soft and chewy.  We had it for both visits - it was that good!!

If you go to the Troy location, be warned that you have to turn on the street before the restaurant and enter the parking lot via the side street.  First visit I ended by going by the restaurant straight onto the highway as I looked for the entrance to the restaurant!!!  Consider yourself warned!

Saturday, January 5, 2013

Decorating with Winter Bling!


I have officially "deChristmased" the house, but have left up a bit of glittery winter bling to brighten the grey days ahead!

A bit of greenery, white berries, and a broken pearl necklace.


A snowflake with a vintage clipon earring.


My bathroom shelf with cute Pottery Barn jar (thanks Jenni) and tiny olive oil shampoos from Florence, Italy.


A gargoyle with winter berries and greenery.

Do you do anything to brighten your house after the Christmas decor is gone?

- Posted using BlogPress from my iPad

Tuesday, January 1, 2013

and a Happy New Year!


A wish for you!

This is what happens when Clever Karen spends the morning at Pinterest, finding Chalkboard Pins and downloading new fonts!

I made this little greeting using a free chalkboard background download from Foolish Fire.  I pulled it into PrintShop2 as a background and added text with fancy fonts and dingbats in white.  Pretty easy to do!

You are welcome to download and use the image for your own personal use and share the link on Pinterest!

Easy Chicken Alfredo Lasagna


Over Christmas, I wanted an easy recipe that I could put together in advance and later pop in the oven to take home to my family.  This is my twist on a "white" lasagna made the easy way using jarred Alfredo sauce.  I was so happy with how it turned out that I've made it twice!

I am going to give you the recipe in "layers."  It would be very easy to customize what you put in each layer, so I will tell you what I used and then give some other suggestions of things to try.


SAUCE LAYER

2 jars of Alfredo sauce

(For my first lasagna, I used sauce from Trader Joes.  It was mild and creamy - comfort food. It thought maybe a bit more salt or spice might be needed, so the second time I added more salt and Italian herbs and a pinch of red pepper flakes.  Second try I used the Classico brand - I tried a Four Cheese and a Asiago style.  Both were very good.  Your favorite red sauce could be used to make a more traditional lasagna.)

NOODLE LAYER


A package of lasagna noodles

(I used Trader Joes no boil noodles.  So easy!  I didn't need the entire box to make 3 layers of noodles.)

Here you can see how I laid the noodles in the pan.


RICOTTA LAYER

1 container of ricotta cheese  (I used a lower fat version)
1 cup grated romano or parmesan cheese (I used a Trader Joes brand that is a blend of both.)
1/2 cup shredded parmesan cheese (again, from Trader Joes)
1 egg
1 teaspoon salt
freshly graded black pepper
2 teaspoons dried Italian herbs  (fresh chopped parley might work as well)

Blend all the ingredients together in a medium bowl.

VEGETABLE LAYER

1/2 package frozen chopped spinach, thawed, drained, and liquid pressed out
1 red pepper chopped
1 small onion chopped
2 teaspoons chopped garlic
salt to taste
olive oil
red pepper flakes, if desired

Saute the chopped onion and red pepper in a bit of olive oil. Add chopped garlic, spinach, and salt.

(I think you could add your choice of vegetables here - maybe mushrooms, olives, squash, arugula.  Next time I think I will try fresh baby spinach, chopped fine.)

MEAT LAYER

Chopped chicken (I used one package of grilled chicken from Trader Joes, chopped in bite sized pieces.  Use any cooked and seasoned chicken.  I think you could also try cooked sausage, bacon,  or seafood.  Or omit the meat completely to make a vegetarian version.)

CHEESE TOPPING

I used a mix of grated mozzarella and parmesan, didn't measure, just enough to generously cover the top.


INSTRUCTIONS:

Gather all ingredients for each layer and prepare in advance.
Use a 9 x 13 pan.  Spray with cooking spray.
Begin layering your lasagna:

1.  Spread 1/3 of a bottle sauce on the bottom of your pan.
2.  Cover with noodles.  Break the noodles to fit or overlap.  (I used 5 noodles for each layer.)
3.  Spread 1/2 of the ricotta mix.
4.  Sprinkle 1/2 of the vegetable mix.
5.  Sprinkle 1/2 of the meat mix.
6.  Spread 2/3 of the bottle sauce.
7.  Repeat layers 2 - 6. 
8.  Top with noodles and then cover with the remaining 1/3 sauce.
9.  Cover with the cheese topping.

At this point, cover with foil and refrigerate.  (It will hold for several days.)
Remove from refrigerator for about 10 minutes before baking (while preheating the oven).
Preheat oven to 375 degrees.  Bake covered with foil for about 45 minutes.  During the last 10 - 15 minutes, remove the foil and let the cheese topping brown.
Let the lasagna set for about 10 -15 minutes before cutting and serving.

Serves 8.

LinkWithin

Blog Widget by LinkWithin