Wednesday, December 31, 2014

Nutella Snowflake Coffee Cake


So I came across this Braided Nutella Bread on Pinterest that I just had to try it. It was surprisingly easy, but I found the dough a bit tough and bland. So I followed the technique, but used a variation on  a coffee cake recipe that I use in my bread machine. End result - cute and tasty!  So here is my version of the Nutella Snowflake Coffee Cake!

Nutella Snowflake Coffee Cake

Dough:
In your bread machine, put the following ingredients, and mix using the dough cycle according to your machine directions.  (If you don't have a bread machine, use either the dough hooks on your mixer or blend and then knead by hand.)  
2 1/2 cups regular flour
1/4 cup butter, softened and cut into one inch squares
1/4 cup sugar
1/4 cup sour cream
1/2 cup warm water
1/2 teaspoon salt
1 1/2 teaspoons quick rising yeast (be sure it is fresh!)
I always check the bread machine while it is mixing. I like the dough to stay fairly soft, so if it seems dry add a bit more water a teaspoon at a time. Let the dough rise for a couple hours, or until about doubled.
When done, remove the dough, divide in half, and form into two balls.  Let it rest about 10 minutes.  Then roll the dough into two 12 inch circles.  Cover a round pizza pan with a parchment paper circle and set the first dough circle on top.

Spread the first circle with Nutella (I used Trader Joe's Cocoa Almond Spread) up to about a half inch of the edge of the dough.

Top with the second circle of dough.  Pinch the edges together - you can brush the inside edges with a bit of water if it isn't sticking together. I lightly pressed a glass on top to mark the center. Then I sliced the dough into 16 pieces - first halves, then quarters, then eighths, then sixteenths - it helps to keep the slices the same size.  

Take two pieces and twist them towards each other.  I think I did 3 twists each time. It was actually quite easy to do this.

Repeat all the way around. Then let rise until about doubled, about another hour or so.
Bake in a preheated 350 degree oven for about 15 to 30 minutes.  My oven actually died in the midst of baking these for my neighbors, so I ended up going to a friend's house to finish them. So the temperature or the time may be slightly off, so watch closely and adjust according to your oven.  Cover the top with foil if it seems to be browning too quickly.

Let it totally cool.  Doesn't it look cute??

I drizzled it with a glaze made of powdered sugar, milk, and a little melted butter before wrapping it up for delivery to my neighbors.


This recipe is definitely a keeper. Next time (after I get a new oven), I may try it with butter, nuts, and cinnamon sugar. Not sure if the snowflake design will be as obvious as with the Nutella, but worth a try.

Vintage Christmas


Before the season is over, just wanted to share a few ways that I used vintage items in my Christmas decorating.  After the epic flooding in my basement this summer, I lost a lot of my Christmas decorations. It forces me to take a fresh look at some the the things that I still had and see what I could do with them!


A friend gave me this old coffee pot when cleaning out her parents' home. A perfect spot to "plant" a little Christmas tree. Next year I will try a real mini one and see if the cats will leave it alone.


A bare spot on the wall where I hung my childhood plaid lunch box.


So obsessed with bottle brush trees. I picked up a package of them at Joann's last year post Christmas and scattered them everywhere. I like the look of this one perched on an upside down tea cup.


More trees and a snowman caught in a mason jar. (Made the snowman years ago, one of the few of my snowman collection that survived the flood.)


I had to toss all the Christmas wreaths that were stored in the basement. Here is a new one I put together using some thrift store sweaters I had stashed away and and some vintage buttons.


I sadly lost most of my vintage ornaments from my grandmother - the water melted the paint right of the them. Wish I hadn't tossed them and kept them as a plain silver color, but was so overwhelmed at the time with trying to save things.  A few were left, and I went out this December to antique stories to try to replace a some of them with some similar ornaments. Put them in a bowl under a tinsel tree.


I added a few red dishes from the dollar store to my stack of blue dishes. The mason jar has a solar light top that I discovered at Michaels - I'm definitely getting more of them!


I also bought a bunch of these cute little frames at Michaels at their dollar spot.  My brother recently scanned all of our family slides, so I added a few photos from when we kids. Will do more of these for next year. 


A few years ago I made some faux mercury class candle holders out of thrift store dished.  Mixed them with a pretty door knob. Put a few bottle brush trees in bleach to turn them white. One of my cats loves playing with these trees and I keep finding them on the floor, thus the wonky shape.


More vintage postcards. Twisted wire as holders in a salt shaker and in a door knob.

And speaking of cats, they did much better this year at staying out of the Christmas tree (at least while I was watching) but they still both had to check it out when I first put it up.

I hope your Christmas was wonderful! God's blessings to all!


Saturday, December 6, 2014

Sweater Wreath


Sweater wreath - thrifted sweaters, vintage buttons, bottle brush trees, styrofoam base, hot glue.

Saturday, September 13, 2014

Shortbread Toffee Bars


Here's another recipe that I have been drooling over on Pinterest. I actually bought a bag of the Heath Bar pieces over the summer to make them, but I confess that I ended up nibbling straight out of the bag and never made the bars. I finally bought another bag and made them on Thursday night. If you happened to be hanging around the teacher's lounge yesterday, you might have gotten a sample of these yummy bars because I brought a few extras to share. Seems they were a hit, so I promised to post the recipe!

These were very easy to make, although you have to bake 3 individual layers, so you can't simply mix them and pop them in the oven. The only issue I had was that my milk chocolate chips did not spread smoothly after they were melted. I think the bag had been sitting around in the pantry for a while.  I simply sprinkled the toffee pieces on top and stuck the pan back in the oven for a couple minutes, then pressed the pieces into the chocolate with a spoon.


Shortbread Toffee Bars

Shortbread Crust  Layer

3/4 cup softened butter
3/4 cup brown sugar
1 1/2 cup flour

Preheat oven to 350 degrees. Blend together shortbread ingredients with a mixer until combined into crumbly pieces. Press the crumbs into a 9 x 13 inch pan lined with foil and sprayed lightly with non-stick spray. (I actually skipped the foil and buttered the pan with the butter wrappers.)  Bake for 15 minutes, until lightly brown. Cool slightly (about 10 minutes).

Filling Layer

1 can sweetened condensed milk (I used the low fat version)
2 tablespoons butter

While the shortbread is baking, prepare the filling.  In a saucepan, melt the butter. Combine with the sweetened condensed milk and heat slightly, whisk together until smooth.  Pour over the cooled shortbread base and smooth. Bake for 12 -15 minutes, until golden and bubbling. Do not over bake.

Topping Layer

One package milk chocolate chips
One package Heath milk chocolate bits (You could also use crunched up Heath bars.)

Immediately sprinkle the milk chocolate chips over the hot filling. Return to the oven for 2 minutes, until the chips are softened. Use a knife or spatula to spread the chocolate over the bars, then sprinkle with the Heath bits. Press the pieces into the chocolate. (If needed, return the bars to the oven for a minute to melt the chocolate enough to press the pieces in.)

Cool completely before cutting.  Store and serve at room temperature.

Original Recipe at Cookies and Cups


Friday, August 29, 2014

Lynktec Rechargeable Apex Fine Point Active Stylus - Review


I recently purchased a Linktec Apex Fine Point Stylus and I think my search for a great stylus that gives me fine point control for writing and drawing has finally come to an end.  I have had my Apex for about 3 weeks and I must say that I love it! 

The Apex is a comfortable length, width, and weight in my hand as I draw or write. To use it, you press the button on the handle for a few seconds and a blue light comes on at the tip. It will work in any application - you do not have to sync it within an app or use Bluetooth.  I have been using it with ease with the Flipink, Procreate, and Paper53 apps and also writing notes in Penultimate.  

The stylus automatically turns off after about 30 minutes, so you do not have to worry about running down the battery.  My first charge has lasted for 3 weeks and I still have not needed to recharge.


The 2.3mm tip is slightly thicker than a large paper clip. It is rigid and provides excellent control - it will write/draw where it touches. I have not had issues with it skipping (like I have had with my Adonit Jot Pro Stylus).  It doesn't not have that annoying easy-to-lose plastic disk like the JotPro does. It writes quietly and moves easily on the surface of the iPad. I love the control! However, if I am looking for a bit more "flow" to what I am drawing, I probably would reach my my Pencil or Sensu Brush.


One important thing to note is that since it does not sync with apps, you will not have any pressure sensitivity when iOS8 is released. The Pencil stylus will be able to take advantage of surface pressure, but I do not think my Apex will be able to use these new features.  I'm ok with that - this is perfect for precise control.


The Apex comes with a lithium ion battery installed and a charging cord. Simply unscrew the cap and plug it into your computer USB port to charge. The cap also stores a replacement nib tip which comes with the stylus. Handy and convenient.

The Linktec Apex Fine Point Stylus currently is listed at Amazon at $69.99 US.  A bit pricey, but I am finding I love it for writing, taking sketchnotes, and drawing. It has been worth the splurge for me!

UPDATE: I've had some frustrations with this stylus as I have used it more often. I have found that when I draw slowly on the diagonal that I get very jagged lines. This really shows when I am trying to do precise writing, which is the main reason I bought it. I don't have issues when I write quickly.  I did purchase new tips, but still having issues.  So I still recommend, but with some reservations.

(Note: I receive a very small percentage of any purchases made through my link to Amazon. Moneys received help me purchase technology that will help my students and me in the classroom.)

My Sketchnote Resources: listing of apps, equipment, examples

Saturday, June 28, 2014

Best Grilled Chicken Shawarma


Those of us living in the Detroit area are blessed to have an abundance of Middle Eastern restaurants.   One of the best sandwiches to pick up is chicken shawarma  - savory chicken wrapped in a pita and slathered with garlic sauce.  (It also usually contains a pickle, which I remove - not a pickle fan!)  Over the years, I have tried a number of chicken recipes to try to duplicate that flavor, but none that really captured it. Until now. Thank you Detroit Free Press Test Kitchen for this recipe!

Ok, you will want to bookmark, pin, save this recipe! Trust me! This is the best recipe I have ever found for grilled chicken. It is the perfect mix of savory and tangy and the yogurt helps to keep the chicken moist.  The chicken is awesome wrapped in a pita, but also works great in salads, pastas, or on its own.

Grilled Chicken Shawarma

Marinade:

¼ cup lemon juice (use fresh, about 2 lemons)
¼ cup canola oil (a light flavored olive oil would also work)
1 teaspoon dried oregano or thyme, crumbled
1 teaspoon paprika 
1 teaspoon cumin 
4 tablespoons plain Greek yogurt (I used Fage non-fat Greek yogurt)
3 tablespoons white vinegar 
4 crushed garlic cloves (ok, I confess, I used 4 teaspoons of that chopped garlic from a jar, worked fine!)
1 teaspoon salt (you might want a tad less, but I liked the slight salty flavor)

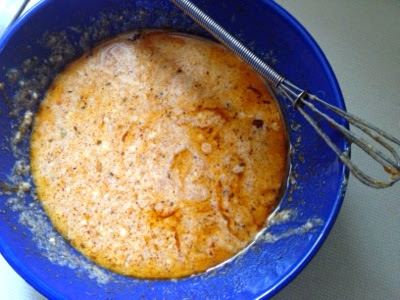
Put all ingredients in a bowl and blend together with a whisk.  

Chicken: use 2 pounds of boneless chicken breast, cut into strips. I did only 8 strips of chicken and wish I had done more because there was plenty of marinade. 

Marinate chicken for 4 - 6 hours in the refrigerator, turning several times.  (I put it all in a covered glass dish, but putting it all in a zip lock bag would work, too.)


The marinade is this wonderful amber color!

Grill over medium heat.  If you don't feel like heating up the grill outside, use a Foreman grill. I'm sure it would work to brown in a non-stick pan on your stove in a bit of olive oil.


Serve wrapped in pita if you wish, or however you want!


The Free Press link above also has a recipe for garlic yogurt sauce, which is another recipe that I have been trying to perfect for years with no success.  I tried it, found it was too salty and the garlic had too much bite.  I am trying some variations and some hints to eliminate the bit from the garlic (removing the green core is one hint I found).  I love a good garlic sauce, so will let you know if I figure it out.  If you have the secret, let me know!

Thursday, June 12, 2014

Gypsy Leftovers Bracelet and Necklace


One of the best parts about the start of summer vacation is that I can channel my creative energies into some personal projects, rather than just always thinking about school. So the past few days I have been having fun making some new jewelry from my stash of beads.


When I came across this bracelet on Pinterest, forgive me, I had to be a bit of a copycat. (I am not selling my jewelry, so I hope it is ok to take inspiration from another work.)


I knew I already had a lot of leftover beads that were in this color family that would be perfect to mix together.  And I had the memory wire - so this was totally made from leftovers, save a couple silver beads I had recently picked up at Joann Fabrics.  The bracelet winds in about 5 layers when on my wrist - a bit over the top, but would be fun with a plain white t-shirt and jeans.


Once the bracelet was done, I still had a few of those flowery blue lampwork beads left, so I decided I needed a matching necklace. I used some waxed linen cord because it could hold the heavy beads but still would have a bit of flow.  I decided not to do a clasp because the necklace was long enough to put around my neck - just tied both ends of it to a silver rose charm.

So Clever Karen is back in action!  I have many projects and ideas saved up and in process, so hopefully I can be a better blogger this summer.  I've already completed a few more jewelry projects, so check back!

Tuesday, January 28, 2014

Door Knob and Oil Can Picture Holders


My sofa shelf, post Christmas.  Lots of faux mercury glass candles.


My new postcard holders, complete with vintage postcards from Venice.  This one is made from an old glass doorknob.  It was easy to bend the wire and stick it into the hole at the top.  Blinged it up by clipping on a vintage earring.  Lots of inspiration from Pinterest to make these, especially from the Petite Michelle Louise blog.


And this one, done with an old oil can.  Easy to make and as cute as can be!  Just stick a twist of wire into the tip.


The doorknob was a bit wobbly, so I balanced it on a old tin mold! Works perfectly as a stand!

And that concludes my clever craft inspiration, brought to you by this below zero snow day!


Tuesday, January 7, 2014

Vintage Golden Remix Jewelry

Over the past few months, I have played around with remixing a variety of vintage jewelry bits.
Old watch - turned into a "locket" removed the insides, added a bit of a dictionary and a rhinestone.
I think this might have been a clear glass drawer pull. Added other beads to bling it up.
Large pin turned into a pendant. Added another vintage bead and charm on one side of the chain as an accent.
Long chain made up from all the leftover bits of gold chains from other projects, all joined together.
All kinds of gold chains and mixed and twisted together.
Flower pin turned into pendant. Clipped onto on other mixture of gold chains.
I often play with all these bits off and on until I find a perfect combo. Enjoyed having a few snow days to finish up the projects.


LinkWithin

Blog Widget by LinkWithin