Monday, December 19, 2022

Bread Machine Sandwich Rolls


Have you ever wanted to make your own sandwich rolls at home, but thought it would be too time-consuming or difficult? Well, I have a recipe that will change your mind! These bread machine sandwich rolls are easy to make and taste so much better than store-bought ones. They are perfect for sandwiches at lunch or a burger at dinner.

I never use my bread machine to actually bake bread, but I love using it to mix the dough for these rolls. All you have to do is add the ingredients to the bread machine, turn it on, and let it knead the dough for you. Leave the dough in the warm machine to rise until doubled. Then divide it into individual rolls and shape them into the desired size and shape. 

Once the rolls have doubled in size, they are ready to be baked. Sometimes, I brush them with a little bit of melted butter before baking to give them a nice, soft crust. And that's it! In just a few easy steps, you'll have homemade sandwich rolls that are perfect for any occasion.

Once you try making your own bread machine sandwich rolls, you'll never want to go back to store-bought ones again. They are so easy to make and taste so much better, it's worth the extra effort. Plus, there's nothing quite like the smell of freshly baked bread filling your kitchen! Give this recipe a try and see for yourself just how delicious homemade rolls can be. Trust me, you'll never want to go back to store-bought ones again!

Ingredients:

  • 3 1/2 cups bread flour
  • 1/3 cup sugar (can reduce, if desired)
  • 1 1/2 teaspoon salt
  • 3 tablespoons dried milk
  • 1 package dried yeast
  • 4 tablespoons butter, cut into small cubes
  • 1 cup very warm water (add more if needed)
  • Sesame seeds (optional)
Directions:

1. Place the bread flour, sugar, salt, dried milk, and yeast in the bread machine and start the machine on the "Dough" cycle. Let the dry ingredients combine for a minute or two.

2. Add the cubes of butter and the cup of very warm water. Let the machine do the work of mixing and kneading the dough for you. If the dough seems too dry, add additional warm water one tablespoon at a time. Once the dough is mixed, let it stay in the warm bread machine cycle for about an hour or more,  until the dough has doubled in size.

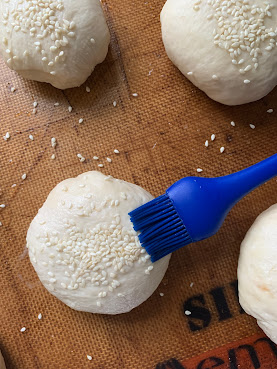
3. Turn the dough out onto a lightly floured surface and divide it into 8 equal pieces. Form each piece into a roll shape and place them on a baking sheet lined with parchment paper. If you wish, brush the rolls with water and sprinkle with sesame seeds. Cover the rolls with a towel and let them rise in a warm place until doubled in size, about one hour.

4. Preheat your oven to 350°F. Once the rolls have risen, bake them for 10 - 15 minutes or until they are lightly brown on the outside. Remove them from the oven and let them cool for a few minutes before serving.

Enjoy your homemade sandwich rolls with your favorite sandwich fillings or as a bun for burgers. 

Monday, December 12, 2022

Spumoni Chocolate Chunk Cookies


Are you looking for a unique and delicious cookie recipe to add to your holiday baking lineup? This week I was inspired by this recipe for Spumoni Cookies by Lani Bakes!

https://lanibakes.co/2022/12/07/spumoni-cookies/

I came across this recipe on Instagram and was immediately drawn to the combination of ground pistachios with both regular and bread flour in the dough. The addition of cherries and chocolate chunks sounded delicious, so I decided to give the recipe a try.

The recipe listed its ingredients in grams, but I converted them to approximate standard US measurements for those who don't have a food scale. The amounts of the add-ins and toppings do not need to be exact, so feel free to adjust to your preference.

These cookies are soft, chewy, and dense with chocolate. They are a perfect addition to any holiday cookie platter and are sure to be a hit with friends and family. If cherries aren't your thing, dried cranberries would also work well in this recipe. Give these Spumoni Cookies a try and let me know what you think!


Ingredients

5/8 cup raw pistachios (90 grams), divided, saving about 1/8 cup for topping

1 stick (110 grams) unsalted butter, melted

3/4 cup (150 grams) sugar

1 egg

1/2 teaspoon fine salt

3/4 cup (100 grams) all purpose flour

1/2 cup (70 grams) bread flour

1 teaspoon baking soda

1 1/2 cup chocolate (milk, dark, or a combination), chopped into chunks, reserving about a 1/4 cup large chunks for topping (I used the large milk chocolate bar from Trader Joes).

8 ounce jar (90 grams) maraschino cherries, drained and chopped

12 whole maraschino cherries, with or without stems

Directions:

1. Preheat your oven to 350F.

2. Use a small food processor to grind 1/2 cup of pistachios into a fine meal. (It's ok if there are a few small pieces). Take the remaining 1/8 cup and roughly chop with a knife and set aside to garnish the top of the cookies after they bake.

3) Melt 1 stick of butter. (I used a medium sized glass bowl in the microwave.) Add 3/4 cup sugar and combine with butter. Add one egg and 1/2 teaspoon salt and stir together.

4) Add 3/4 cup all purpose floor, 1/2 cup bread flour, and the half cup ground pistachios. Stir gently until partly combined. Some dry ingredients should remain unblended.

5) Add the chopped maraschino cherries and about 1 1/2 cups of chopped chocolate. (The additional chocolate will be used to top the cookies before you bake them.) Fold them into the dough and combine until all the ingredients are combined together.

6) Use a scoop or a spoon to make balls out of the dough ( about 1/3 cup per cookie). Place on 2 cookie sheets lined with a silicone liner or parchment paper, leaving ample space between cookies. Top cookies with the reserved large chocolate chunks.

7) Bake the cookies for about 12-15 minutes, rotating the baking sheets halfway through the bake to ensure they cook evenly. The cookies should be golden at the edges and still soft in the center when they are finished baking.

8) Press a maraschino cherry into the cookie while it is warm and add the remaining pistachio chunks into the melted chocolate on top.

9) Let the cookies cool for a few minutes, then transfer them to a baking rack to cool.

10) The cookies can be stored at room temperature for a week. If you want a bit of "bite" to the chocolate chunks, refrigerate to harden the chocolate a bit.

Makes about 16 cookies, depending on size.


LinkWithin

Blog Widget by LinkWithin