Showing posts with label Technology. Show all posts

Sunday, October 20, 2013

Visual Notetaking with the Flipink app


Last summer while at the Apple Distinguished Educator conference, I was inspired by the visual notes taken by ADE Brad Ovenell-Carter. Although I am no great artist, I thought it looked like fun. I have been using the past few weeks in church to make attempts to begin to develop my skills with this interesting and creative form of note taking. Yes, I am drawing in church, just like I used to do as a kid, only this time with a purpose and on an iPad!

I have tested out several different apps. Paper53 seems to be the favorite of most people who do visual note taking, but I have had difficulty using their "undo" and "zoom" features, so although I love the way my stylus responds on my iPad surface while using this app, it is not my first choice. I've also used Sketchbook X and Adobe Ideas which are both free and have good features and some things I don't like. (Paper53 is free, but you really need to do the in app purchase to unlock the tools and ability to blend color, which currently would cost you about $10.)

I've ended up mostly using the FlipInk app. The price currently is $1.99 which is a good value. I like that I can create notebooks similar to Paper53. It includes a grid that can be used as a background, which is helpful for a novice like me. It has pencil, eraser, crayon, ink, marker, and paint brush tools and you can vary the width and transparency of the tools which is a feature not available in Paper53. You pinch to zoom in and slide two fingers horizontally to undo. Color selection is done by a familiar color wheel tool. It also allows you to add a photo or text box which sometimes is a nice addition. The one thing I don't particularly like is the look of the "ink" - it doesn't seem to have the "flow" effect that other apps have.

I've purchased several new styluses through Amazon which have helped with the process. At school, I have inexpensive styluses that we use, but I felt I needed some better tools to help with the fine work. I especially LOVE the Sensu Brush - it is just like using a paintbrush on the iPad. Here are links to some of the items I've purchased:

Inexpensive Stylus - for student use
Adonit Jot Pro Stylus - for fine lines, writing
Sensu Brush - amazing brush that works on the iPad!
Sensu Solo Brush - another less expensive option (I have not tried it)
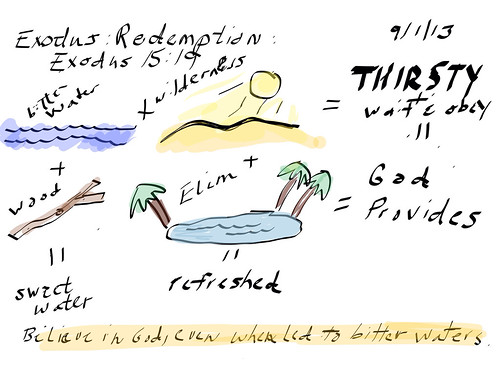
Here are a few more of my visual notes. The one at the bottom is my first attempt, so hopefully you can see some progress in my skills over the past few weeks.
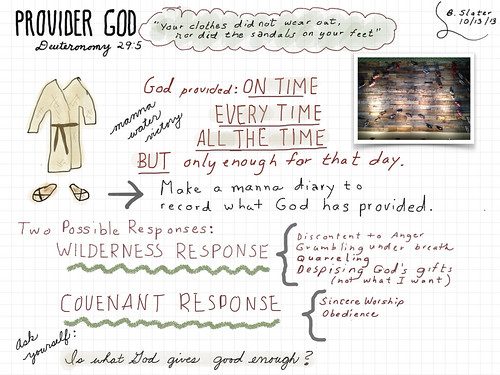
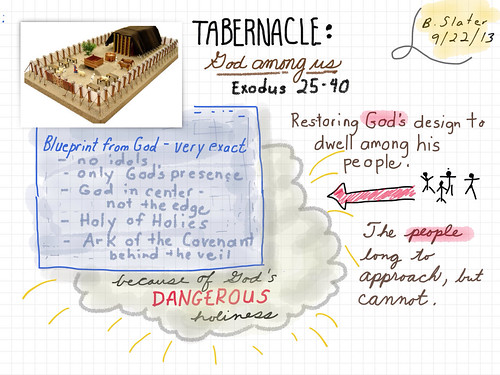
I've so enjoyed experimenting with this process. I find it keeps my mind engaged while I listen and the process of trying to capture the notes visually allows me to organize and find fresh connections. If you are the type who likes to doodle, why don't you give it a try??


This one above was done with Paper53.
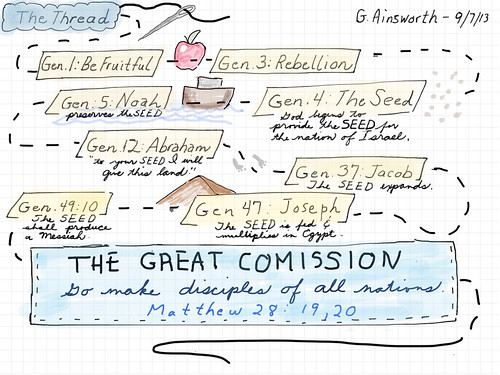

(This one was done with Adobe Ideas and was my first attempt.)

Monday, September 2, 2013

Jay Bosch's World War II History

To celebrate my father's 88th birthday today I have published his war memoirs in a free multitouch book on iTunes! Here is the story of the book:

About 10 years ago I encouraged my father to write out his memories of his service and being wounded in Italy during World War II. I typed and printed out his "book" and later self published it on Lulu. I recently realized I should put his book in digital form onto his beloved iPad so he could share it with others (since he takes his iPad with him almost everywhere he goes).

After the Apple Distinguished Educator conference in Austin this summer, it dawned on me that I should give my dad's story a larger audience (much as I do for my students) by publishing it on iTunes. I realized I could easily transform the text and photos that I already had into a pretty cool multitouch book using iBooks Author. I included photos of artifacts that he had saved from Italy and filmed a few new video interviews to enhance the text. I also experimented with using Hyperstudio Author to build an interactive widget showing his medals and patches.

I am so excited to be able to give this book to my dad as a birthday present.  Please share the link with anyone interested in a primary source first person account of World War II or who is interested in seeing what can be done in iBooks Author.


Here is the link where you can download the book onto your iPad for free:  https://itunes.apple.com/us/book/jay-boschs-world-war-ii-history/id683470567?mt=11

Wednesday, April 3, 2013

iPad Creativity!

Sorry I've been AWOL for the past few months.  I've been deep into putting together some presentations for our Michigan education technology conference (MACUL).  It is so much fun to be able to share all the creative things that our students have put together on the iPad!  Here are the 2 presentations that I gave at the conference:


Even if you aren't a teacher, you may discover some great new creative apps to use!

Friday, February 8, 2013

Recycled Computer Key Magnets

A few days ago, I shared the retirement card I made for my friend using old recycled keys.  Changing computer keys into magnets is super simple and fun craft to make.


You will need old computer keys (just use a screwdriver to pop them off the keyboard, a needle nose pliers, small magnets (I got mine at Michaels - use those coupons to get 40% off!) and hot glue.


The keys will have a "peg" sticking up from the inside.  Take a needle nosed pliers and you can just twist of off - it will break without much effort.


Take your hot glue gun and "flood" the inside about half full with hot glue.  Then "float" the the magnet on top.  Push it down with the pliers so it is level with the edge of the key.


I made a bunch of these and have them on my file cabinet in my computer lab.  The kids (and me) have a lot of fun spelling words out using the keys!


Such a fun craft to make as a gift - spell out a name or appropriate phrase!

Saturday, January 26, 2013

Recycled Computer Keys - Retirement Card


A few months ago, a good friend of mine retired from her job as a computer programer.  I had to come up with something clever and appropriate as a retirement card for her!  I recycled some computer keys from some old keyboards at school to make this "card" for her.


The top picture is a bit blurry, so above are a few closeups.   Here is the text:

It's a beginning, not the END
DELETE At&t and never RETURN
ESC your old job
Take CONTROL
SHIFT your way of thinking
Explore each new OPTION
Relax at HOME

I thought I came up with some pretty clever and appropriate ways to use the special keys!


 I made the background using PrintShop software and printed it on glossy computer paper.  I taped the keys onto the paper.   I used tape rather than glue because...


...if you turn the keys over, they are MAGNETS!

I know the IT guy at work thought I was crazy when I asked him to save the old keyboards!
I'll post in a few days how to make this fun little magnets - so easy!

Sunday, November 6, 2011

More Presentations to Share

I gave two more presentations this week, this time at the ISACS conference. Since all of my creative energy has been going into these presentations, I thought I would share them. Those of you that have an iPhone may discover a few apps that you might enjoy! Now that this is done, I hope I can start adding a few new clever, creative posts again!


Thursday, August 4, 2011

10 Fun Free Photo Effect Apps

I love to play with photography apps! I used to try to add effects to images using Photoshop but it was too much work. I've also enjoyed exploring websites like Picnik and BeFunky to add effects, but I needed an internet connection to do this. But now, it is much easier to simply use my iPad or iPhone to experiment with adding effects and filters to my images. I have found many free apps that will allow you to create thousands of interesting effects - you can play for hours!

So above is a simple photo of a peony that I took with my iPad. Let's see what can be done with it!

MobileMonet Lite app (free) - This app turns your photo into a black and white textured picture that you color using your finger. It gives a nice stylized look! You also can color just part of the photo. I know there are many other apps that let you colorize your photo, but I think this one has gives exceptional depth to the image.

PaintMee Lite app (free) - I love watching this app as it paints each stroke of paint! The texture on the photo is so cool and it looks like a real painting if you view it in a large size.You can customize the detail of the strokes of paint and the colors to make a variety of looks.

BeFunky app (free) - Many effects and edges to try. This shows the retro effect with a grunge edge. Lots of gungy effects here! Very easy to use, although the save button seems to be somewhat cropped off the corner of the screen.

Effects app (free) - I like how easy this app is to use - you simply pick a filter and a frame. It is easy to try all kinds of combinations.


Picture Effect Magic (free) - Again, there lot of combinations of effects and filters - some are a little wild but there also are many beautiful effects. I like the addition of the glowing light effect on this black and white version. There are many options in this app so its not as simple to use as some of the other apps.


Fotofunia (free) - This fun app lets you add your photo onto a billboard or into a museum gallery or put your head into photo effect. Some of the effects are goofy, but I must say that their "Pencil Drawing" effect creates the most stunning drawing effect of any app that I have tried!


Fotolr Photo Studio (free) - I enjoy playing with the tint of my photos using this app - here I added an intense peachy hue to the image. Besides the color effects and the many frames, this app also lets you add wacky lips, hair, and eyes to photos.


ArtCamera (free, for a limited time) - This app lets you add effects to your photos that imitate various artists and artistic styles. It has an animated path to follow as you select your effects that can be a bit confusing, but there are some neat options here! Above is the mosaic effect.


LunaPic (free) - over 30 effects to add to photos including a neat 3D cube effect. I like this "Photo Spread" effect. Very easy to "try on" the effects!


Crazy Photo Booth (free) - This app has 25 effects and lots of pop up ads. But the "Obama" effect that it generates is awesome!

Note: These are a mixture of iPhone and iPad apps, but they all work fine on an iPad. Since these are free versions, many of them have ads or have buttons for additional in app purchases or upgrades to a paid app. All of them let you upload a photo from your photo gallery and most also let you use the camera. Most let you save your finished image to your camera roll, although a few will only let you email the image. The images are saved in a variety of resolutions depending on the app.

Update: As I find additional great apps I will add them below:

Pixlr-o-matic (free) - another very easy app with retro effects and and edges. I like the interface on this one!

Saturday, January 16, 2010

Google Alerts for Your Blog


Do you have a Google Alert set for your blog? It is an easy way to keep track of who might be talking about you online or using/featuring your "stuff." Unfortunately, people don't always ask before using. I usually don't get bent out of shape as long as somehow I am credited. But I do like to know. This week my alert turned up this picture of my inspiration board on a blog called Toolulu.

And here is where you can set up a Google Alert. It is a great idea to set one up for your name and your blog and will take less than a minute!

Monday, September 7, 2009

Book Publishing using Lulu

A few years ago my father wrote down his memories of his experiences in Italy during World War II. I had typed it, scanned in some of his pictures and documents, inserted them into the narration, printed it, and put it into a notebook. I've always wanted to test out one of the publishing sites that will take your document and turn it into a book. So for my Dad's birthday I uploaded the document to Lulu to be published. It was fairly easy to do - it took maybe a couple hours to figure out some of the settings. I turned the Word file in to a pdf (it saved all of my formatting) and made a high resolution jpg in Print Shop that could be used as a cover. It took less than a week to receive the books. Here is the end result:


The cover is shiny and very professional looking. The pages were exactly as they looked in my Word Document (only in black and white - didn't want to pay the extra for color pages as only a few of the images were color). I ordered 2 books - the cost was under $20 total, including shipping, which I thought was very reasonable. It was printed in paperback form, but there are options for hard covers and various sizes.


The page below shows the telegram that was sent to my dad's parents to let them know he had been wounded in combat:


Click HERE to see how the ordering page is set up at Lulu. I love that if my Dad wants additional copies of his book, it will be a piece of cake for me or anyone to order them!

Sunday, August 30, 2009

Welcome to iFifth Grade

The start of school and being back in the classroom teaching fifth grade has been a whirl! I have a great group of students and I am enjoying getting to know them. My theme for the year was inspired by my new iPhone. It is "iFifth - Want to learn something new? Here's a class for that!" I have a picture of a huge iPhone out in the hall with the student names under each of the apps. I've also started an iFifth blog which the students think is very cool!

I wasn't planning to post a lot of school stuff here, but I just had to shared the video that I made while the students were moving into class on the first day of school. I set up a camera in the back of the room on a tripod and turned on a setting that took one picture every 2 seconds. It turned out pretty cool, I thought!

Saturday, August 8, 2009

Linkwithin Widget

You might notice that I have added a little Linkwith widget to the bottom of each entry. It is supposed to direct you to other posts on the blog that have related content. Smiling - sometimes it works great and sometimes it presents unusual matches! Hopefully it may point you back to some older posts that may have something that would be of interest to you!

Monday, August 3, 2009

Flowers on Mackinac Island

While my friends were off biking, I wandered around the island a bit, enjoying both the beautiful gardens and the clumps of wildflowers that dot the island.

The flowers by the hotels and inns were especially lush - maybe because of the abundance of composted manure????


Wildflowers along the shoreline.

I had fun playing around with the macro setting on my camera.


The big hill in front of the Grand Hotel is now naturalized with wildflowers. Loved it! If you ever stay here (or pay the $ to tour the grounds), ask for the map which lets you take a guided guided tour of all of the gardens.

And then, the best part of my stay at the Grand - sitting on that lovely geranium lined white porch and reading (on my Kindle).


Here is a mosaic that I made using some of the pictures that I took. Could resist adding one shot of the pretty plates in the dining room!

Created using the cool tools at Big Hug Labs.

Thursday, July 16, 2009

Joining with Clever Educators at the Apple Distinguished Educator Institute


Sometimes my creative life overlaps with my life as an educator and I just have to share! I just got back from 5 amazing days in Orlando at the Apple Distinguished Educator Summer Institute. I joined with 150 of the most creative educators in the the country to learn about the latest ideas in education and technology. We met at Full Sail University and enjoyed using their high tech facilities to stretch our knowledge and skills.


During the five days we had the opportunity to tour Full Sail and talk to many of their students. We took some specialized classes and had fascinating presentations from Jayson Witmore and from Ray Zahab about the Impossible 2 Possible. One of the most unique opportunites that we had was a photo shoot with Pulitzer Prize winning photographer Bill Frakes. Yes, I felt like America's Next Top Model!


Apple always feeds us well at these conferences! We had lots of great desserts - loved these little mini parfaits in shots glasses!

And isn't this the most unique presentation for a salad?


Part of the institute was working on a small group project on personalized learning. My group was the best - we worked on developing a model for training elementary teachers in Challenge Based Learning. One of the highlights was working in the green screen studio - I haven't laughed that hard in a long time!


Here is the video that our team developed to introduce our project - Ann and Linda rocked at putting this together!!


And here is the outtake from our filming - probably no one else will find this funny, but it left us rolling!


My complete set of images from the institute are here at Flickr. My deepest thanks to Apple Computers for putting together another incredible learning experience!

Tuesday, July 7, 2009

Twitter Tags and other Geeky Jewelry


Yes, this is quite a switch from all my pretty beads and lacy, flowery soldered tags that I have been making! I am heading out for the Apple Distinguished Educator Institute in Orlando in a few days and decided to make some tags to represent some of the online identities.


My Clever Karen tag represents this blog. On one side I put the cluster map with the dots showing the locations of my visitors! I made a chain with a few crystals on it and a hook at the bottom so I can wear it with different tags.


My identity on Twitter and Plurk and Flickr is karlyb. On the back of the "Twitter Tag" I put my profile icon and my stats.

Making these tags is sooooo easy! Use any photo editing software (I used Print Shop 2) to design your pictures. I used memory frames that I ordered from Alpha Stamps. It takes less than a minute to click your picture into the frame. You simply insert a tiny tab into the side of the frame and slip it shut. If you are careful, you can open it again to change the pictures.


I also made a few soldered tags. One is a small "Twitter Tag" and the other is the symbol for the ADEs. I think I will have the coolest, geekiest jewelry to wear at the Apple Distinguished Educator conference!


You can see the entire "collection" of geeky jewelry here in Flickr.

LinkWithin

Blog Widget by LinkWithin