Saturday, January 31, 2009

Mexican Town Restaurant

On our latest symphony night we met downtown at the Mexican Town Restaurant. Which is not to be confused with Mexican Village Restaurant (Donna!) which we discovered are two entirely different places located on two entirely different sections of Detroit's Mexican Town area and on different sides of the expressway. Mexican Town is a several block community filled with Hispanic Restaurants and businesses. I hadn't been down there to eat in years and years. Please note that right now there is major construction in the area, but it really wasn't too difficult to navigate to get there.

The inside looks like your basic cantina with brick walls and columns and posters on the wall. It was quite busy on a Friday night. The meal starts with a basket of fresh warm chips and a mild salsa. The menu is filled with your basic Mexican food favorites and has a few unique "flaming" offerings. Prices are very reasonable - most under 10 dollars and the portion sizes are large.


Here is what the order of botanas looked like. I thought it unusual that it was topped with green olives - most times I see Mexican food is topped with black olives. The person who ordered it didn't like green olives and I do, so she shared them with me. Someone else ordered the wet burrito and it was huge - enough for 2 to 3 meals. It looked like most people walked out of the restaurant carrying some of their meal home.


I ordered the chicken enchildas. They came topped with cheese - it looked like a lot of people were ordering their meals with extra cheese which looked so yummy but not very healthy! They were filled with shredded chicken and were good, although nothing very ususal about them.

I know people who are fans of Mexican food are very fervent about which restaurant in Mexican Town is the best. If you have a favorite, I'd love to know!

Thursday, January 29, 2009

Cranberry Bliss Bars (a la Starbucks)


I do love the Cranberry Bliss Bars that they sometimes have at Starbucks. Do you know what the secret ingredient is that gives them that unique taste? It's candied ginger (and you can find it at Trader Joes)! A while back I did a search on the internet to see if I could find anything to replicate the bars. Here is my version that I put together from several different recipes.


Cranberry Bliss Bars

2 sticks of butter, softened (1 cup)
1 1/4 cups brown sugar
3 eggs
1 teaspoon ginger (powdered)
1 teaspoon vanilla
1/4 teaspoon salt
1 teaspoon freshly grated orange peel (can omit)
1 1/4 cups dried cranberries, slightly chopped
2 cups flour
1/2 cup white chocolate, coarsely chopped
1/4 cup candied ginger, finely minced
6 ounces cream cheese, softened
3 cups powdered sugar
1 Tablespoon vanilla
1 - 2 Tablespoons milk
2 Tablespoons dried cranberries, minced
1/3 cup white chocolate, melted

Preheat oven to 350 degrees F and lightly grease a 9 x 13 pan with cooking spray

To make the bars: Beat butter and sugar together. Add eggs and vanilla and beat until fluffy. In a separate bowl, stir together flour, ginger (powdered), salt, and orange peel. Add to the butter mixture, beating well. Fold in the 1 1/4 cup cranberries, the 1/4 cup chopped white chocolate, and the candied ginger. Spread the thick batter into the pan and bake for about 30 minutes or until lightly golden brown. (Watch carefully so not as to over bake.)

To make the frosting: When the bars are cooled, beat together the cream cheese, powdered sugar, vanilla. Add the milk a little at a time, until the frosting is blended. Immediately sprinkle with the 2 Tablespoons minced cranberries. Put the 1/3 cup white chocolate into a zip lock bag and microwave on high for 10 seconds. Check and then heat for another 10 seconds, until the chocolate is melted. (Note: keep checking it! I learned the hard way that if you microwave it a bit too long it WILL melt the plastic bar and will burn the chocolate and let me tell you that burnt white chocolate does not smell delightful!) Snip off a little corner of the zip lock bag with a scissors. Then squeeze the white chocolate onto the top of the frosting in a zig zag pattern.

Cut into bars immediately because the white chocolate hardens fast and makes cutting the bars very messy.

Wednesday, January 28, 2009

Hanging Around Clever Karen - Episode 15


Rose Quartz Silver Pendant
strung on pink seed beads and tiny pink pearls


(Sorry there hasn't been much new here the past week. I have some new recipes that I hopefully can get posted soon.)

Wednesday, January 21, 2009

Cranberry Coconut White Chocolate Oatmeal Cookies


I found this silicone cookie/muffin mold on sale at JoAnn's after Christmas. I thought it might work for the Anzac Cookies that I made in the fall that stuck so terribly in the cast iron pan.

I decided to try it out for a bake sale were were having at school. I used the same recipe as before, but substituted dried cranberries and white chocolate chips for the apricots and pecans. I also used vanilla for flavor rather than the orange peel, but I think next time I'd use the orange.

I sprayed the mold lightly with cooking spray and pressed the dough into the molds and baked for about 15 minutes. Then I let them cool for about 10 minutes. When I tipped the mold over they slid out easily or released with a gentle push on the bottom. MUCH easier than trying to carefully pry them out of the cast iron. The down side is I could only bake six at a time and then had to wait to make the next batch, so it was a slow process.


After they cooled, I put about a 1/4 cup white chocolate chips in a zip lock bag and heated in in the microwave for about a minute. When the chocolate was melted, I snipped off a tiny bit of the cormer and zigzagged the melted chocolate on top of the cookies.

I LOVE this cookie recipe! The cookies are dense and chewy and soft in the middle and have a bit of crunch on the outside.


I saw Target has some heart shaped silicone molds in their Dollar Spot - I think I'll try to pick some up to use for my next batch!

Monday, January 19, 2009

Pete's Place - Broadway Cafe - Ferndale

My friend Anne and I have gone to Pete's Place in Ferndale twice to eat. Both times my camera battery gave out after a few shots, so forgive the mediocre pictures. This restaurant is not in the downtown Ferndale area ( it's located on the corner of Hilton and Woodward Heights) and is in a small rectangular building, so it would be easy to drive right by and not know that it was an excellent restaurant. They serve breakfast, lunch, and dinner - our waitress told us that it is very popular with the weekend brunch crowd. Both of our visits were for dinner on a Monday night, although Anne also had been for lunch and had a delicious sandwich.

The place inside feels narrow with an aisle with tables on either side. The decor is modern casual with sleek tables and chairs mixed with some wicker chairs. The walls are covered with Broadway musical posters. Cozy and comfortable. Bring your reading glasses at night - it is a bit dark to read the menu if you are "of a certain age" and have those kind of issues!

The evening menu has a variety of sandwiches, salads, and entrees. For my first visit I had a chicken dish - I think it was the chicken picata - and it was very good. For this visit Anne ordered Broccoli, Rigatoni, and Pine Nuts. It was loaded with pine nuts and was very tasty.


I had the Sauted Salmon. The salmon had a slight crust (great texture) and had a little creamy white wine sauce under it. It was served with orzo, carrots and asparagus that was cooked perfectly, and swiss chard. I don't think I've ever had swiss chard before. It was sauted in a sweet tangy sauce - some kind of sweetened vinegar I think. It was really good. My only criticism - I wanted more of that creamy sauce for the salmon!


We didn't try the dessert but they feature homemade pies each night. Maybe next time. I'd like to come back and try the breakfast sometime, too.

Friday, January 16, 2009

Provence Smock Apron

Brrrrr, school closed today due to extreme cold! My laptop says the temperature is 9 below with windchill at 30 below or more. Good morning to have my laptop in my lap to keep me warm and try to catch up with my blogging.


Here's one more apron that I made as a Christmas gift. This is the Provence Smock apron from the A Is for Apron: 25 Fresh & Flirty Designs
book I picked up in Shipshewana last summer. (This also is the pattern I started making with upside down toile!)

Of course the book had the pattern on a single page that needed to be enlarged. I used a clever trick to do it. I scanned the page and then loaded it into the BlockPoster site. This is a site where you can upload an image and then it will divide it up into pieces and print each section. I enlarged to 4 x 4 and printed. Then I taped all the pages together and my pattern was the correct size!!


I used fabric from the Moda Next collection. I really like how the straps cross the back - I think that is quite cute!


And to finish it off, I added a unique vintage button from my stash in the front!


Monday, January 12, 2009

Little Girl Apron


Here's a peak into two of the packages I showed you last time. I made 2 aprons for my friend's daughters. I used computer transfer paper to put their faces onto fabric and then sewed the face/fabric onto aprons that I designed for them.


The black and white fabric was accented with red rickrack, red ties, and lined with red fabric.


Here's how I folded the aprons up before I wrapped them in the packages:


And if you are looking for more "apron inspiration," here is a link to my favorite apron idea book:


Saturday, January 10, 2009

Pretty Packaging

My belated Christmas gifts finally arrived at their destination last week, so now I can finally post some pictures of them. Here's a peak at the box before I sealed it up and sent it on its way:


I found the wrapping paper at Michaels crafts - it looks like some funky vintage wall paper. Silver with block flocking!!! Do you remember when this was all the rage for dining room walls?


You will have to wait for my next post to see what was inside!

Wednesday, January 7, 2009

Vintage Jewelry Remix Closeups

Please forgive one more post on my necklaces. I just wanted to show a couple of closeup shots.


The clear cut glass beads really look pretty with the vintage gold color, I think.

Did you notice the cute Big Ben charm??

Tuesday, January 6, 2009

Vintage Jewelry Remix 2

This is the end result of my vintage remix necklace making binge!


Necklace One - a pearl earring dangling down in front from a piece of a flower rhinestone necklace. Hanging from a mixture of chains including a piece of a Monet necklace. Some pearls, stones, and other beads.


Necklace Two - I found some amazing cut glass beads in a button jar and they were stored in my button stash. I mixed them with some old and new chains and a few other beads. I made it extra long so that I could double the chain if I wished.


Necklace Three - I still had a few more pieces, so I made another necklace with a fringe of things dangling from a square stone bead.


Ok, these were soooo much fun to make and I liked the end results so much that I jangled around the house all evening with them all looped and layered around my neck:

Sunday, January 4, 2009

Vintage Jewelry Remix 1

I get in trouble when I see things in magazines, online, or in stores and think to my self - "I could make that!" Yes, I have several shelves filled with "I could make thats." (Anyone else have this problem??) One of the things I've recently been admiring has been some funky junky necklaces made out of pieces of vintage jewelry. A few weeks ago I discovered some old chain pieces in my mom's old jewelry box. Then over break I wandered through a few antique stores and I looked for a few additional pieces that I could use.

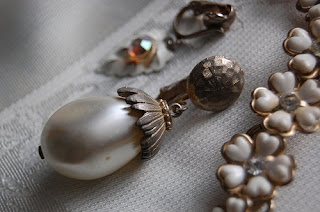
This big dangling pearl earring - perfect for a dangle on a necklace.


A broken flower bracelet with rhinestones that was in a bag of junky pieces for $5 dollars.


A long Monet chain with an unusual texture and gold beads. Another earing shaped like a leaf with a bit of bling that was in the junk bag. Then I added in a few other pieces of chains and beads from Munro's as well as pearls and stones leftover from other projects.


And then I spread everything over my desk. (No one ever said creativity was neat!) I spent an entire afternoon playing with all the pieces. In the end, I had 3 very unique vintage junk necklaces. Tomorrow I will unveil the end results!

Saturday, January 3, 2009

Munro Crafts - Berkley

Munro Crafts is the kind of store that you could easily drive by on 12 Mile for years and never realize what an amazing, jumbled, dangerous place it is. Amazing, because it has a huge craft selection, including one room where the walls are covered with beads and jewelry findings. Jumbled, because it even with the enlargement that they did several years ago, it still seems to be a crazy mess inside! And dangerous, because I always end up spending 4 times more than I plan! So I usually only go in a few times a year when I need something specific for a project - too many temptations!

I stopped in a few days ago to get a few beads, chains, and findings that I needed for some necklaces I was making. (Stay tuned, pictures of my new creations will be coming.) So I thought I'd take a few pictures of some of the beads. Every wall and aisle is covered with strands of beads of every size, shape, and color. I love the variety of stone beads that they have.


I am addicted to making jewelry with the freshwater pearls. Again, all colors and sizes, and they can be surprisingly affordable if you pick the pearls that have slight blemishes. In December the pearls were all 25% off.


I also like the fun and funky glass beads. Here's some cute Christmas beads.


There's more - boxes of Bali silver (I get in BIG trouble here), and crystals, and chains, and more.

(Note: it often is very busy! Everyone gathers around the counter looking at crystals and waiting for someone to help them. The help is very efficient, but it can be crazy and overwhelming at times to get waited on. Why they don't have a "take a number" system is beyond me????)

If you make jewelry, it is worth the trip to go here - it is the best bead store I have found in the area.

Friday, January 2, 2009

CityVu Bistro - Holland

For lunch on Christmas Eve, our family went to the CityVu Bistro in Holland, Michigan. The restaurant is about a year old and is located on the top floor in the City Flats Hotel. (note: top floor in Holland = 5th floor) It is a very sleek, contemporary building and prides itself as being a "green" hotel.

The view is quite nice, although with the 48 inches of snow that had fallen in December in Holland, about all you could see was white and brown. I'll bet it is stunning in the spring looking down at some of the nearby tulip gardens. It has a couple of little outdoor patios which I'm sure are popular in the summer time.


The menu is modern and features about a dozen flatbreads that are baked in a classy wood fired stove that is located in the front of the restaurant. I liked that the lunch menu lets you combine 2 items and have half of a flatbread, salad, or sandwich. I think the menu was a bit too gourmet for my folks - they had a hard time deciding what to get, but I enjoyed looking at all the unique selections.

My brother ordered a sandwich with turkey, pesto, roasted red peppers, and cheese. He said he enjoyed it. The chips were a nice added touch.


The folks had some kind of soup (can't remember what) and then a 5 cheese flatbread to which they added shrimp. I think they thought it was ok, it just wasn't the kind of food they were used to. The shrimp was a little bit spicy.


I had half of a tangy spinach salad - it had dried cherries and marcona almonds. I loved the marcona almonds - I need to try those on a salad at home! It was swimming in a bacon balsamic dressing which was delicious, but just way too much of it. I also had a wild mushroom flatbread with Boursin cheese. The flatbread tasted a bit "flat" (haha)! I expected a variety of mushrooms but I think there was only one kind (baby bellas?). They seemed to be simply sauted and then plopped down on top of the cheese. There was no sauce or much flavor to them. The flatbread was thin and crunchy, but needed toppings with more flavor. There were enough other topping choices on the menu, so I'd be willing to try another variety of flatbread.


Since it was Christmas Eve we indulged in dessert. Our waiter recommended the carrot cake and we weren't disappointed by it! It was a huge rectangle that was dense with currents and nuts and it was WARM! Then they served it with a side dish of cream cheese frosting, so you could add the frosting to each warm bite. What a genius idea!!


The service was attentive, although our food was slow to arrive. That may have been because it was right before Christmas and they were letting us eat a relaxed meal, which was fine with us. I especially liked the assortment of Harney tea they offered! And note, because it is a green restaurant, they won't bring a glass of water unless you specifically ask! Oh, and the flatware was very cool - I liked the long thin handles. SoI enjoyed eating here - it is a unique place for Holland and I'd like to try it out again sometime.

CityVÅ« Bistro on Urbanspoon

Thursday, January 1, 2009

Toffee Pecans and Walnuts


I discovered the easiest way to make toffee flavored nuts! I found this jar of Toffee Nut Glaze at Target. It was next to some kind of pan contraption that you were supposed to buy to glaze the nuts, but I figured that you could get the same result just by stirring in a pan. You add a little water to the nuts and glaze and stir constantly for about 5 minutes until the water evaporates. Then you spread and separate them on some parchment paper to cool. They are really good - in fact I just had some for breakfast!!!


I put some of them in a glass jar with a pretty ribbon and berries and then in a homemade gift bag as a gift for a friend.

LinkWithin

Blog Widget by LinkWithin